
Is your microwave not heating food but it runs? That’s a key hint that all is not well. The error won’t let you cook, bake, warm, reheat, or make your favorite cup of coffee.
Top causes for microwave not heating food but runs include broken magnetron, overloading diode, dead switch, wrong setting, and thermal fuse. These are detailed functionalities that requires expertise to resolve. But your microwave oven may not be heating due to an error in setting!
There are more causes of a microwave that doesn’t heat food yet is running.
Microwave Won’t Heat? Causes and Fixes!
If your microwave stopped working or heating, check the following;
1. Wrong Setting
Please don’t assume that you know it all! Failure to press the timer and key in the cooking time can keep you waiting for food to cook forever. It is common in modern microwaves with advanced timer settings requiring extra keenness when selecting. A wrong setting also includes low power selection even when your meal requires high temp.
2. The Nature of Dishes
Putting non-microwavable material in the oven can cause heating errors. Put something that can’t be microwaved. The microwave is fit to heat all your foods, but that heat-resistant bowl may be why your food is not heating.
3. Overloaded Plate
It is common sense not to overload your oven. But if you are hosting guests, you may want to cook quickly. The fastest to do that is to cook in a single batch or two. But not with a microwave. It will run but won’t heat your meal.
4. Broken Magnetron
Be patient and cook your food in batches. Alternatively, you can choose other cooking options to cook more food in a single batch. Your stove top or oven can accommodate more food. You require patience and creativity to achieve the same outcome.
All the above causes of microwave not heating are not technical, thus easy to solve. But a broken magnetron requires expertise to diagnose and resolve.
With a voltmeter, you may gauge whether the magnetron is working. That’s why we always recommend the services of a technician. Also, the component and others like the diode and capacitor have a lethal voltage.
9 Steps To Diagnosing And Fixing A Broken Magnetron
I had my GE microwave not heating. When I called the experts, here are the steps they advised me to follow;
- Step One
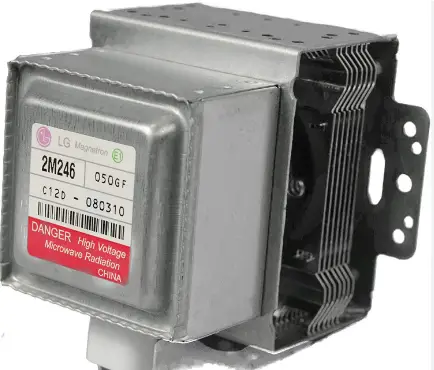
Determine other signs such as loud humming, grinding and clicking as they indicate a broken magnetron. Also, check if the magnets are intact. The unit has two magnets that resemble a metal cylinder. These two should have a silver color.
Check for the brown color and breakages. This step determines what to do next. With a blown magnetron, you have no choice but to replace the component. So, order a new magnetron from a reliable source. The new magnetron must match your microwave model.
- Step Two
You have the new magnetron aside. So, you will need to remove the burnt one and replace it. Unplug the oven and wait for it to cool down.
- Step Three
Unscrew the nuts on the sides of the microwave to remove the frame. Keep the screws safe.
- Step Four
After removing the frame, all the internal components are now visible. You need to identify the magnetron. It is a tiny metallic boxy component but is not yet time to touch. Step five is crucial. It saves you from injury!
- Step Five
You have to discharge the capacitor. Grab a screwdriver and touch the tip of the capacitor.
- Step Six
Detach the wires that supply power to the magnetron. Again, keep the screws safe.
- Step Seven
Finally, it’s time to fix your new magnetron into the empty slot where the old magnetron lay. Hook the unit and fix it with the same screws.
- Step Eight
Congratulations! You just fixed the new magnetron. Attach back the original wiring that you detached in step six.
- Step Nine
Fit back the frame and test your oven with a cup of water. Use a microwave-friendly cup.
5. Damaged Diode
A microwave won’t heat if it has a damaged diode. It might run but heating your food will be nil. The reason being diodes provide the magnetron with high-voltage DC power to emit electromagnetic heat waves.
Besides the microwave, not heating, you might experience a wiring-burning smell and a sparkling or buzzing sound. When that happens, you must replace the diode as it is not repairable. It would be best to have the original diode that matches your oven’s model.
7 Steps To Diagnosing And Fixing A Broken Diode
- Step One
Detach your oven from the plug and allow for cooling.
- Step Two
Unscrew the frame to remove the control panel.
- Step Three
Discharge the oven’s capacitor – touch the tip using a pair of pliers or a screwdriver.
- Step Four
If you are familiar with the diode, unscrew it from the support (it attaches itself to the capacitor)
- Step Five
Grab the new diode and install it by screwing it on the support bracket.
- Step Six
Reassemble the frame and secure all the screws back.
- Step Seven
Get the control panel in place.
6. Dead Door Switch
Your microwave not heating food but runs may be due to a broken door switch. The oven is not latching or sensing a closed door. The problem happens if you have been roughing your oven.
Slamming your microwave door and opening it wider than 90 degrees can break the hinges or interfere with the switch. Most microwaves have 2, 3, or 4-door switch sensors depending on the model. If one fails, the oven shuts down the heating process. Luckily, you can replace the switch or door. But you require expertise. If you aren’t familiar with the exercise, call your tech to do the task.
- Step One
Push the door firmly to ascertain that its hinges are intact. If they are not good, the oven will not heat.
- Step Two
Examine and test the switch terminals with a multimeter. The multimeter terminals must show continuity and read at zero.
- Step Three
If there is no continuity, a replacement remains the only option. Talk to your manufacturer to carry on the replacement for you. A microwave door is a major component that may not work with the wrong fitting. Engaging in replacement exercises may not give you desirable results.
7. Defective Thermal Fuse
The thermal fuse is a heat regulator in your microwave. So, your microwave not heating food but runs could be a sign of a blown fuse. A replacement will solve the issue. If you are confident with thermal fuse replacement process follow these steps;
- Step One
Unplug the machine
- Step Two
Unscrew the frame to access the internal components where the thermal fuse lies.
- Step Three
Discharge the capacitor.
- Step Four
Follow your appliance’s user manual to locate the thermal fuse.
- Step Five
Once locate the fuse, unscrew to detach the wires.
- Step Six
Replace the old thermal fuse and screw back the frame.
- Step Seven
Test your oven if it heats.
8. Damaged Capacitor/ Transformer
Microwave not heating up may mean a damaged capacitors. The component stores high voltage to feed the diode, which converts the power and provides the magnetron. So, it is a crucial component in your oven that ensures heating occurs.
Testing the unit requires expertise due to the lethal power it holds. Consider getting a tech to perform the task. Nevertheless, we have the steps;
- Step One
Unplug the microwave.
- Step Two
Unscrew all the visible bolts that hold the frame together.
- Step Three
Remove the frame to expose the guts.
- Step Four
Locate the capacitor.
- Step Five
Discharge it by touching its tip with the tips of pliers or screwdrivers.
- Step Six
Test continuity with a multimeter.
- Step Seven
Use the screwdriver to detach all the wires that connect to the damaged capacitor.
- Step Eight
If you ordered the right capacitor, grab it and attach the new one to its slot. Fix all the wires and screw back the bolts.
- Step Nine
Fix back the frame and test your oven.
Disclaimer: Microwave capacitors are lethal as they hold high voltage. If you are not confident handling the device, leave it to the experts. Stay safe!
9. Error On The Control Board
Whether it is LG microwave not heating, Whirlpool, or any other model, errors on the control boards can happen. That may be due to a bug or damage. Before ruling that it is a damaged internal operation, you can try to clear technical bugs by resetting the unit. Unplug your oven and leave it for a while before reconnecting. If it were a bug, it would remove and work again.
A greater problem with the control board means an overhaul. The replacement can be an expensive process. Talk to your manufacturer or technician for a more informed decision. If repairing your microwave costs a hundred dollars, a new one is a better option. You must top up the amount and acquire a brand-new oven.
Final Words
Your microwave not heating food but runs could be because you aren’t doing things right. Check if you overloaded the unit or made a wrong selection. It could be that you are using an unfriendly microwave dish. Use the right utensils. Also, open and close the door perfectly to be sure it isn’t a switch error or broken hinges.
A technical hitch such as bugs, a damaged diode, a thermal fuse, a capacitor, and a magnetron can cause a heating error. Resolving the technical issues in your microwave needs expertise. So, talk to your dealer, manufacturer, or tech. Above all, take care of your microwave. Slamming may damage some components.
